Monday 8 October 2012

Alpha Tag update

I've been a bad blogger. I haven't posted anything for such a long time. I have been particularly uninspired just lately, in fact the only thing I have really made is my alpha tags for the Chocolate Baroque Tag swap. You can tell how long it has been, the last tag I blogged was I is for insect and here we are in October and I've just sent off S and T and there are only 6 tags left to make.
So, to get up to date, here are J,K,L,M,N,O,P,Q,R,S & T all at once!
    J is for Jute                                   K is for Kite                                      L is for Lace

 Following on with
   M is for Magnetic                        N is for Nature                                  O is for Ornate


 Next up we have

   P is for Peacock                         Q is for Question                         R is for Romance
               

and, last but not least are
                             S is for Sewing                                         T is for Tree
So, there we are, all up to date now. Just the last 6 letters of the alphabet to do. Its been a long project, but definitely worth it to get such a wide variety of work from so many people.

Gina x

Wednesday 30 May 2012

A book card

After thinking about it for an age, I finally got around to making my first book card this week. My friends had made one at a Saturday class that I hadn't been able to go to and I had seen one by Debbie Dolphin in Craft Stamper. Neither seemed the right size for what I had in mind, so I made up my own measurements as I went along and ended up with this...
This is the front view, its about the size of a paperback but a bit deeper.
I went overboard with the spellbinders 'Bitty Blossoms' on the front, but I kind of like the effect.
I stamped the peach pearlescent card first with one of the Big Blossoms stamps from Chocolate Baroque. I have a feeling this one has been discontinued, but the new 'Sunny Sunflowers' would do the same thing. The lines of the petals have put an attractive design onto the petals of the flowers.


The next view is of the inside...


Again, its a bit OTT on the decorative front but who cares! I love the design paper - its by KaiserCraft - I've bought a whole lot of the new designs as they are gorgeous and I'm a paper addict anyway. These flowers were from Wild Orchid Crafts who have a brilliant range of flowers and other embellishments.
On the whole, I'm fairly happy with how it turned out for a first attempt and I liked the size and proportion.
If you want a go, here are the instructions:
The book cover is from a piece of 12 x 12 pearlescent but all measurements are in cm

  • cover - 1 of 30.5 x 16
  • mats - 4 of 15.4 x 12.9 and 2 x 15.4 x 3
  • design paper - 3 of 14.9 x 12.4, 2 of 14.9 x 2.6 and 1 of 12 x 9.5
  • pages - 2 of 25.5 x 14.7 and 2 of 25.5 x 12.2
Cut the book cover and score in 13.5cm from each short side.
Attach the mats front, back and on the spine - inside and out
Attach the design papers front, back and on the spine - inside and out. The smaller design paper goes behind where the 'pages' fit.
Make the pages by scoring every half an inch using a Hougie board along the short width of the card. Fold in a concertina, making sure to keep the folds square and properly aligned. Do this to all 4 of the card pieces.
Interlock the 'pages' and glue top and bottom to hold them in place.
Now its matter of choice - I stuck the pages in place and then decorated inside. Some people prefer to do the decoration and then stick the pages on afterwards - its up to you.
Cut some decorative strips with a decorative punch or spellbinder and attach them to the front of the pages as shown.
Die cut some corners or use purchased metal corners for decoration.
Decorate front and insides as you like with a scene or sentiment. These are computer generated and die cut.
I have another one in mind, but it will be next week before I manage to make it. 
Gina x


Monday 30 April 2012

Keeping Busy

Although its very busy at the moment, I've managed to make time to make a couple of cards. The first is a birthday card for a friend from card club.
Its an easel card made using the Honey Bee themeplate by Chocolate Baroque


The images are all coloured using pro markers and the honeycomb on the bottom is gold embossed and then coloured. 


The flowers and bee wings have added glitter - a necessity!!


I've use a little circular sentiment from craft works. I was quite pleased with this one and the stamps are truly gorgeous.


My next card is a real departure from anything I've done before. It is for a colleague's wedding.


Its quite large - 18 x 24cm as it has to be signed by all of the department.


Its worked out quite well - the bow is well over the top - but I kind of like how it looks.


The paper was purchased pre embossed as the size is just too big for my little cuttlebug... Do I really need the grand calibur?


I'm currently working on another card using the bee stamps which has to be finished in the next couple of days, so I'll post that at the weekend.


Gina x

Tuesday 24 April 2012

Alpha Tag Swap

I can't believe how fast the time is flying by. Late last year, I signed up for the Chocolate Baroque Guild Alphabet Tag Swap.
The idea is that over the course of the year, we make 2 or 3 tags per month and swap them between members of the guild. By the end of the year, we should have 26 tags made by other members, showcasing a variety of techniques and Chocolate Baroque products.
So far, we have completed 9 tags and have reached as far as I in the alphabet.
I've been intending to blog my tags for some time, but have only now got around to it. So here are my first 9 tags.
 January's letters were A and B, I choose the lovely Crafty Individuals stamps and vintage fringing to make my 'A is for Abbey' tag. The 'B is for Butterflies' features a classic Chocolate Baroque stamp and a selection of die cuts by Marianne, Tim Holtz and Crealies.
February brought with it C and D. Again, Crafty Individuals and Chocolate Baroque were my stamps of choice in 'C is for Chic' and 'D is for Darling'. Both February tags had a vintage feel.
March was a challenge to get three tags completed in a month when I was really busy with work. I managed it but must have been one of the last to submit my tags.
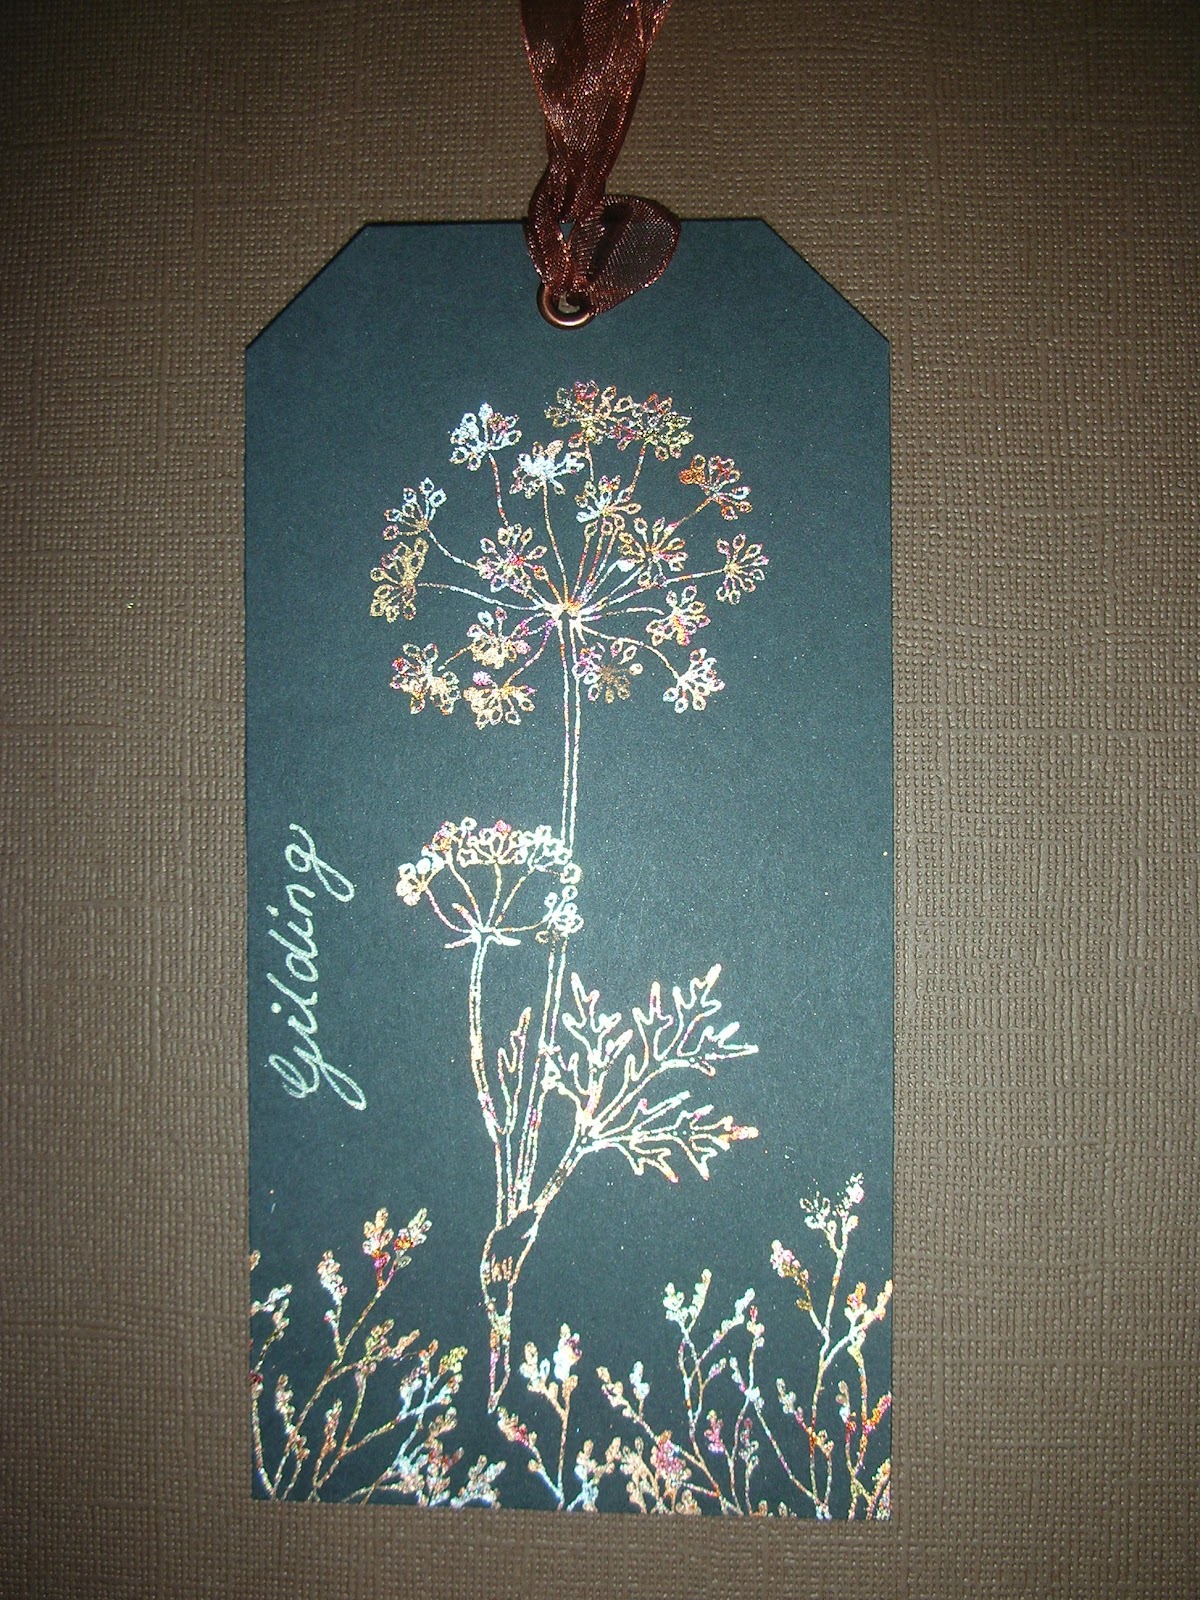
I chose Chocolate Baroque stamps for all of my projects this month. 'E is for Elegant' uses 'Belle' 'F is for Fan' uses repeated stamping and embossing of the fan element from 'Peacock Fan' and I used stamps from 'Wild Meadow' to complete 'G is for gilding'.

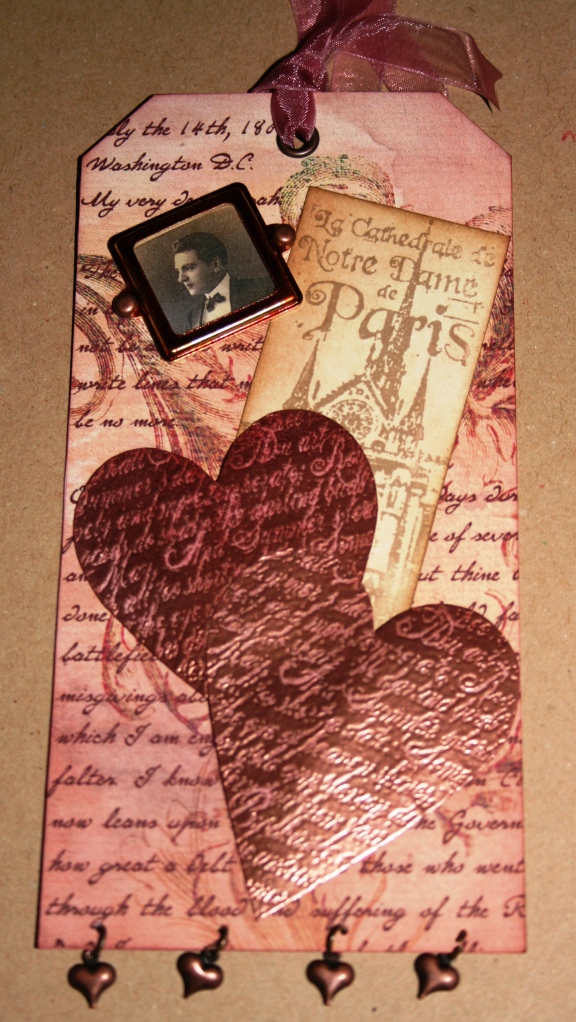
If I thought March was tough to meet the deadline, then April was something else. Madness at work, Easter holidays, multiple family birthdays and occasions as well as a week away in the sun meant I was really up to the wire on this one. My H and I tags were completed with just a few days to spare. They arrived at their destination on Saturday 21st April for a deadline of 23rd April. Eek.
Again, classic Chocolate Baroque stamps were used in my 'H is for Hidden' and 'I is for Insects'.
I have to say though, that the new TH Tattered Floral Garland Die is delightful and sure to be a firm favourite in the future.
I really am loving this swap and its great waiting for the postman to arrive each month to see what surprise tags I'm sent. It isn't too late to join in, though you won't end up with a full alphabet now. If you are interested, go on over to Chocolate Baroque , join the guild and join in.
Bye for now,
Gina x

Sunday 25 March 2012

Ruby Wedding... another one

It seems its the time for Ruby Weddings. This time it is my sister who has been married for 40 years. No stamping on this one, just die cutting and dry embossing.

I've had this gorgeous paper in my stash for ages and I'm pretty sure its a 'Making Memories' one. Its distressed with aged mahogany and faux stitched.

The beautiful ruby red metallic card was found at the NEC last year. I  embossed it with one of the new Spellbinders M-bossibilities. It looks fab IRL.

The heart is all of the dies from the Nellie Snellen heart die pack layered up and the sentiment is computer generated, die cut with Spellbinders.

A ribbon, a little double bow and some gems tie it all together.


Hopefully things will start to quieten down at work soon and I can get to do some more crafting (and blogging).

Everything seems so last minute at the moment.

Gina x

Tuesday 14 February 2012

Mountainside

No crafting at all at the moment as I'm in New Hampshire for a week's skiing. The weather hasn't been great, with really high winds blowing the snow off the mountain and temperatures as low as -13Celcius. To say its all man-made snow though, its pretty good and we are having a great time.
Gina x

Friday 27 January 2012

National Flag Colours

Phew, only just going to make it for this week's MDUC challenge to use your country's national flag colours.
Here is my entry, using Tilda with heart balloons from this season's sweet crazy love collection.
Better post quickly as links close in 8 minutes!!
Hugs, Gina x

Wednesday 25 January 2012

Pretty Birdcage

I've finally got round to using one of the stamps from the Pretty Birdcage stamp set from Chocolate Baroque. Its a gorgeous set and I bought it almost as soon as it was released, together with the lovely Honey Bee set. Life has been so busy that I've only just managed to use it, and that was in a very quick make.
One of the ladies at card class has unfortunately had a minor stroke and I wanted to get a card made fairly quickly. This stamp is beautiful and doesn't need much in the way of embellishment so it was ideal. Its coloured with pro-markers and the bird glazed with crystal laquer.
I do hope she recovers quickly, so get well soon Pat, we really are thinking of you.


Hugs, Gina x

Thursday 19 January 2012

Black and White

This week at Magnolia Down Under Challenge, pretty much anything goes as long as the image is coloured in black and white. I thought this was a great challenge and here is my submission. 


I've used Tilda with Daisy from this season's Sweet Crazy Love collection.


The backing papers are a mix of computer generated and Magnolia. The border is a die cut done with Memory Box Cherish Border die. These dies are wonderful to use - coated in teflon, the intricate die cuts just slide out of the dies without sticking - brilliant.


The flowers and corners are from Wild Orchid.


A bit of ribbon and card candi finish it off.


Thank you for looking.


Gina x